I’ve developed quite a few WebRTC applications over the last three years and noticed that as ML-based features arrive on almost every popular application one way or another, there’s been an increase on feature requests that involve speech to text, sentiment analysis, natural language understanding and computer vision.
Almost every time one of these features is implemented it requires a considerable amount of engineering resources, probably because the available tools have a steep learning curve or aren’t a good match for the specific use case.
TL; DR: The complete source code can be found on this repo.
Pion WebRTC, an easy to use WebRTC library
While developing WebRTC apps. that require more features than a typical video conference there are quite a few tools on the WebRTC space that can help, however, they could be tricky to use (there’s dedicated guide on how to build the WebRTC Native API) or hard to extend. That’s the reason I felt the Pion WebRTC library was like a breath of fresh air, developed in Go, almost identical API as the browser’s (which may not feel completely idiomatic in Go, but that’s a subject for some other time) and pretty easy to use overall.
Here’s a sample of all it takes to create a PeerConnection, feed it an SDP offer and get an SDP answer back.
import "github.com/pion/webrtc/v2"

func CreatePeerConnection(offer string) (string, error) {
  pcconf := webrtc.Configuration{
    ICEServers: []webrtc.ICEServer{
      webrtc.ICEServer{
        URLs: []string{"stun:stun.l.google.com:19302"},
      },
    },
    SDPSemantics: webrtc.SDPSemanticsUnifiedPlanWithFallback,
  }
  pc, err := webrtc.NewPeerConnection(pcconf)
  if err != nil {
    return "", err
  }
  err := pc.SetRemoteDescription(webrtc.SessionDescription{
    SDP:  offer,
    Type: webrtc.SDPTypeOffer,
  })
  if err != nil {
    return "", err
  }
  answer, err := pc.CreateAnswer(nil)
	if err != nil {
		return "", err
	}
	err = pc.SetLocalDescription(answer)
	if err != nil {
		return "", err
	}
  return answer, nil
}
It’s pretty straight forward if you ask me.
Show me the code (structure)!
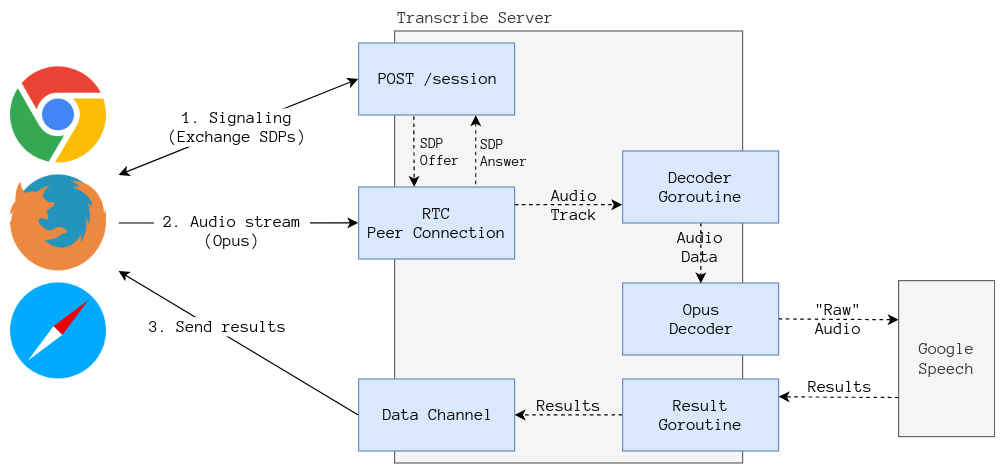
We’ll build a single server to handle the signaling and the webrtc traffic, this ideally would be split into two microservices since it’s very likely that both will have different scale needs on a more realistic scenario.
The server will expose a (very) simple
REST API
on port 9000, there’s a single POST /session endpoint that receives an SDP
offer and returns an SDP answer. Every time a client (browser) invokes the
endpoint, the server
creates
a new PeerConnection that’s ready to receive an audio track.
If the WebRTC connection is established the server’s peer connection will
trigger an OnTrack event, letting the application code know that there’s a new
track. If it’s an audio track we dispatch a new Goroutine that:
- Creates a new StreamingRecognition request.
- Decodes the RTP packets and writes the PCM audio to the recognition stream.
- It checks if the track finished or if we haven’t received an RTP packet over the last 2 seconds.
- We close the recognition stream and check the result of the recognition.
- If we got something out of the recognition stream, we serialize it and send the results to the browser through a DataChannel.
If the explanation from above wasn’t overly clear, hopefully the next diagram explains it better.
What’s the purpose of this?
It is true that using WebRTC to stream audio to a backend isn’t the only way to
do speech to text on a realtime stream, after all nothing stops me from hooking
up a ScriptProcessor to a local audio MediaStreamTrack using the WebAudio API
to stream the raw audio using a WebSocket connection, however, that solution
is far from being optimal.
WebRTC uses the Opus codec to encode audio data, Opus is designed specifically with voice encoding (wideband) in mind, this means that we’re using a lot less bandwidth if we send the audio through WebRTC. Opus also implements error correction in case some packets are lost, which make the codec ideal for streaming voice.
How does it look?
The project also includes a sample of how to use the speech to text server. If you got the project running locally it should be enough to navigate to http://localhost:9000 and press the Start button, speak a little and then press the Stop button.
If this is the first time you access the microphone through that URL the browser will show a dialog asking for permission.
This is how it should look like:
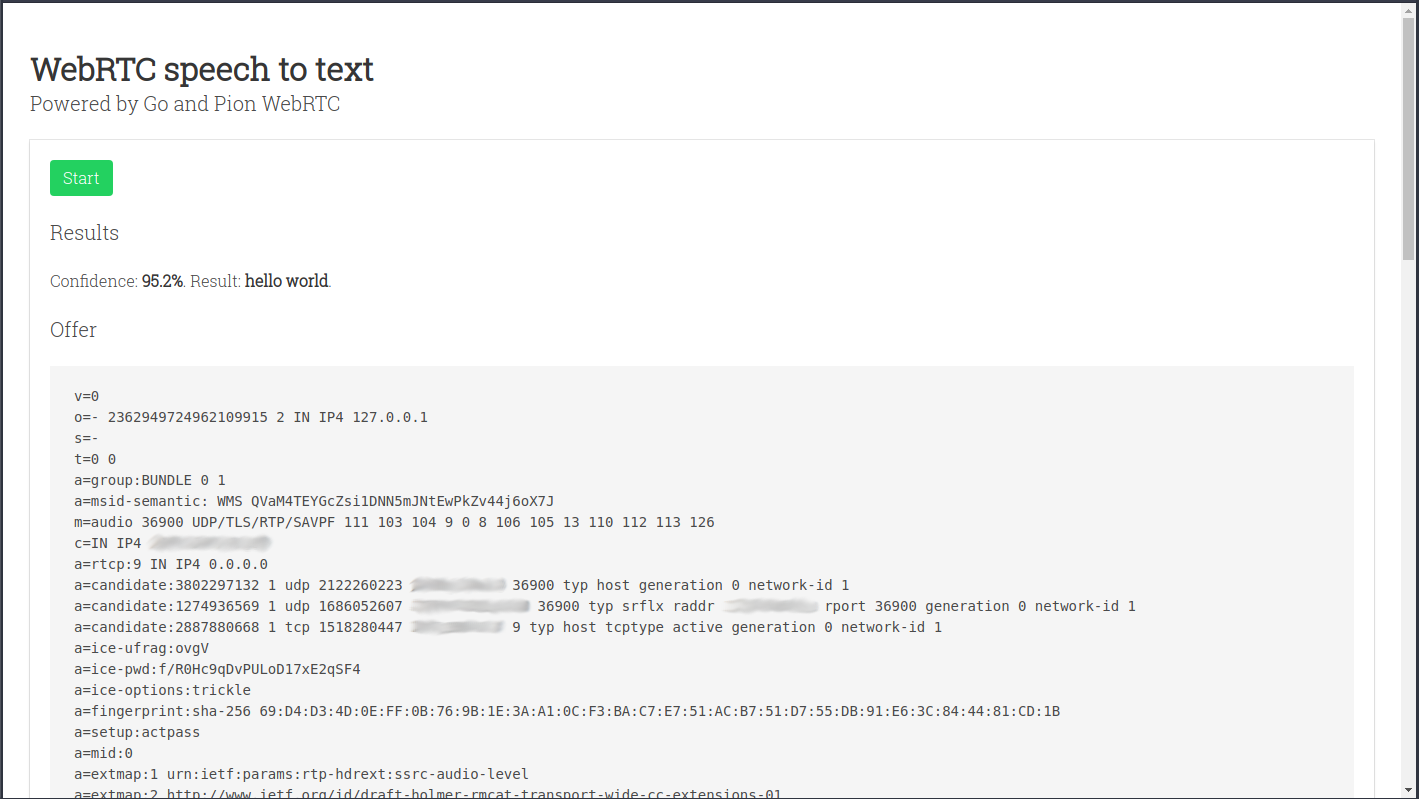
The recognition results should appear after the Results header, the text shown below Offer and Answer are the SDPs that were exchanged with the server. Here’s some recommended reading if you want to get a better understanding of what’s happening.
What’s next?
That’s all for now, there’s another blog post in the works were we’ll do some primitive voice detection to work around the Google Speech limitation of 60 seconds on streaming recognition.